
FIVE TIPS FOR AN EFFICIENT ABLETON LIVE PERFORMANCE
- Feb 28, 2024
- 4 min read
Updated: Apr 3, 2024
Ableton Live is a great tool for both producing music and performing live. Today, we're going to give you
some helpful tips to make your Ableton session the most efficient it can be for performing a live set!

1) Name and Color Code Scenes in the Master
A “scene” in Ableton is essentially the horizontal rows that are in Session View. The Scene Launch button can be seen in the Master track, and if you click one of these, it will trigger every clip in that scene at the same time! Each scene can be used for a different part of your song and performance, and there are a few ways to keep the Master track organized.

You can name each scene by selecting the box, pressing Cmd+R, and typing in the name. Examples of helpful names could be “Verse”, “Chorus”, or if you are performing multiple songs in your set you can set the name as the title of the song. It might also be helpful to color code each song in your set - you can do this by right clicking on the scene, and choosing a color at the bottom of the drop down menu. Another option is to adjust the BPM and time signature for each scene - this can be super helpful when going from song to song.
2) Use Follow Actions
“Follow Actions” are a tool you can use to create instructions for how long you want a scene to play for, and what should happen after it is done. To access this feature, double click on the number on the right side of the Scene Launch button. Then click “Follow Action” to activate the instructions for that scene.
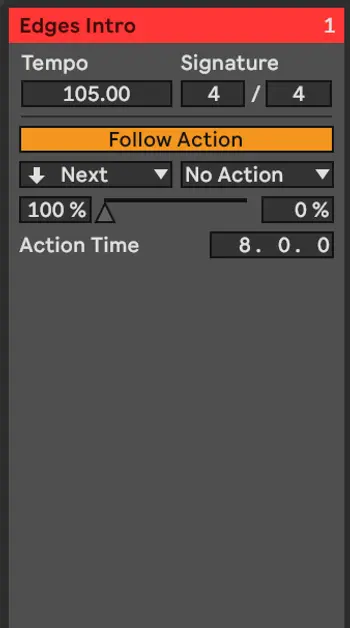
For my live sets, I use Follow Actions to trigger the next scene so I don’t have to click it myself. To do this, I first make sure the drop-down menu to the left says “Next” (which implies that after a given amount of time the scene will move to the next), and then set the “Action Time” to the amount of measures I want that scene to play. There are a lot of ways to use Follow Actions, such as stopping the whole session, playing again, or randomizing the order of which scenes play!

3) Set Your Record Quantization
The word “quantize” means to make recorded midi or audio rhythmically accurate by moving all of the notes to line up on the grid. Because we are human, it is incredibly difficult to record a rhythmically perfect performance on the first try, so quantizing allows us to keep all of the parts of the song clean and in line with each other! A helpful setting for live performance is to enable “Record Quantization”. This will automatically quantize what you are recording in real time, so if you are performing a loop live, you won’t have to worry about going back and quantizing it. To set this up, just press Edit at the top, and scroll down to the “Record Quantization” menu. There are then options for what type of note you want to quantize to. For example, if you want the notes to automatically move to the closest sixteenth note, you would click “Sixteenth-Note Quantization”!
4) Midi Mapping

Midi mapping is a fun feature to use if you are performing with a midi controller. This tool allows you to link different knobs or pads to what they can control in your Ableton session. An example of how I like to use midi mapping is to put an autofilter on the Master track, and link it to a knob on my controller. I find that using the filter is a great way to end or transition between songs, and it’s easy to just turn the knob to activate it instead of using my mouse on the computer. You can set up midi mapping by pressing Cmd+M, clicking on the parameter you want to control, and then moving a knob/touching a pad or button to link it. You can then press Cmd+M again to close out of midi mapping mode.

5) Freeze and/or Flatten Tracks
When performing a live set in Ableton, it’s important to monitor your CPU load, as if there is an overload, it can cause issues. One way to reduce your CPU load is to freeze and/or flatten your tracks. Freezing a track essentially means you won’t be able to make adjustments to the midi or audio effects, so this may be useful for if you are using any kind of backing tracks. You can do this by right clicking on a track, and pressing “Freeze Track”. You can always unfreeze it by right clicking again, and selecting “Unfreeze Track”, if you’d like to work with the plug-ins you have on that track. Once a track is frozen, you also have the option to flatten in. Flattening the track will bounce it to audio, and print any plug-ins you have into that audio track. You can do this by right clicking on a frozen track, and pressing “Flatten Track”.

Ableton has endless possibilities for creativity in performing live, and this is just scratching the surface of what you can do. We hope these tips help your workflow, and make your performances more efficient overall!
Written by Sadie Azersky
Edited by Nan Macmillan


Comments